Wednesday, February 29, 2012

Review: Maybelline SuperStay 14Hr Lipstick (photos and swatches)


I really wasn't planning to purchase this Maybelline 14Hr Super Stay Lipstick at all, or even doing a review for it. But, I was at Target the other day with a good friend of mine, and she is a fan of lipsticks (and I am not), so of course we both have to stop by at Maybelline's stand to check out their new lipstick line.

There is this one color that really caught my eye, it is called Perpetual Peony and it is a muted purple pink with a satin finish. Some colors have metallic sheen, but this one has an opaque color and better color payoff. So, I was standing there for almost 10 minutes to decide whether to purchase one or not, well I guess now you know what my decision was! :)

So, Maybelline SuperStay 14Hr Lipstick comes out in so many shades. There are 20 different shades! From pink to nude, and coral to red. Basically these lipsticks are supposed to have a long wearing formula, and the colors are pigmented and rich that last for 14 hours.

The reason why I am not a fan of lipstick is because there is no lipstick that can hold in my pout for at least an hour without moving, so I have to keep reapplying it which I don't mind. I eat and drink constantly, and that of course makes my lipstick disappears quickly. Therefore, I really cannot tell you whether it really 14 hour stays or not, so so so sorry. However, when I was wearing this lipstick, it did stay for a while, but then I ate and drank something, so it started to fade away. I honestly do not blame it because seriously there is no lipstick that won't fade when you are constantly eat or drink (at least for me).

I love the texture of this lipstick, it is soft, creamy and so easy to apply. I always apply lip balm first before I put this on, so that the lipstick won't look chalky or not smooth. This lipstick does have a smell, just like a typical lipstick smell if you know what I mean. So if you are sensitive to fragrance or hate weird smells, then you might wanna skip this :)

Because I have a super pigmented lip, this color will look more purple when it blends to my actual lip color. Not flattering. So if you have the same pigmented lips like mine, I suggest you to neutralize it first by applying concealer or a nude lipstick. Then, apply this Perpetual Peony, and you'll have a pretty soft pink lip.

Overall, I like the texture and the pigmentation. It is really smooth and creamy, the color payoff is good just in one stroke.

Where to buy: any local drugstores. Prices may vary, I got mine for $7.29 at Target.

So do you think are you gonna love it? or leave it? Let me know! You can comment below, tweet me or post on my Facebook wall! :)

Love Love, 
Alexandra 


Lavender Smoke Tutorial


Happy Leap Day loves! I am always so excited when it comes to February 29th, it feels like this date is so special, even though it is actually the same as other days and I am not doing anything special to celebrate, haha. Anyway, back to the purpose of this post. It is a tutorial! Woohoo!

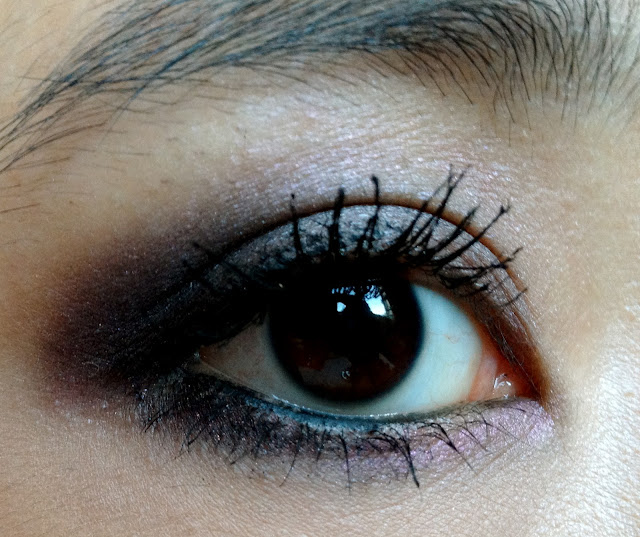
I named this look a Lavender Smoke because it is a medium purple tone eyeshadow, and I paired it with a deep dark purple to create that smokiness (hope it makes sense! lol). Anyway, just see the tutorial and you'll understand what I mean :) hope you like it loves!

Ohhh and don't forget to enter my giveaway! Enter here.

Eye Products Used 
(Face products used are at the bottom of the page)
NARS Eyeshadow in Lhasa, MAC Motif, MAC Beauty Marked, MAC Carbon, Physician Formula Organic Wear Lash Boosting Mascara.
Brushes: Sigma E40, Sigma E25, Stila #15
Update: I made this tutorial a few days ago, so I was still using the Physician Formula mascara. I discontinued using it now. Click here to find out why. 


Steps by Steps 


Finished Look


Face Products 
Concealer - Sonia Kashuk Hidden Agenda Concealer Set (click here for review)


What do you think about this look? Let me know your opinions! :) You can leave in the comment below, tweet me, or post on my Facebook wall :) 

Love you! 
Alexandra 

Tuesday, February 28, 2012

$1 Sweaters (Best Investment! LOL)


Hi loves!! I just want to share a quick post for you all. I went to Walmart yesterday, and saw Valentine's themed sweaters for sale for only $1!! The sweaters are from Hanes. I looovvee comfy and oversized sweaters. I wear it at home, for sleeping, even for doing errands out! Winter is not my favorite season, but I love when I get a chance to wear an oversized sweater.

All the sweaters on sale were all in size Large and X-Large. I bought two of the large ones. Even though the large size is too big for me, actually it almost fits me perfectly (as you can see in the picture, not bad right?).

I got a white and a hot pink one, and the quotes that are in the sweaters are just too cute!!

I am pretty sure they are still on sale right now, so if you like an oversized, comfy sweaters, I think you should get one too! Only for $1!

By the way, do you like this kind of random post? If you like it, I'll keep including it on my blog! It is just basically about what's going on my daily life. If I have something interesting to show you or to say to you (that is not beauty related), I'll post it up in this 'Daily Life' category. Let me know what you think in the comment below! or you can tweet me, 'wall' me too!! :)

Chillin' with my comfy sweaters, 
Alexandra <3

Click for my Twitter; click for my Facebook

no makeup on! just got off from shower haha! 

Review: Is organic mascara good for you? feat. Physician Formula Organic Wear Mascara


Physician Formula just came out with its new line of mascara that contains 100 percent natural ingredients, which is called Organic Wear 100% Natural Lash Boosting Mascara. This mascara will do everything for your lashes - enhancing, volumizing, lengthening, and even extending your natural lashes in 4 weeks! So, who doesn't want it? 

Little before this, I loved the Organic Wear 100% Natural Jumbo Lash Boosting Mascara, and I have run out for three tubes of it. I loved it because it really volumizes my lashes, so they look full and long. However, this mascara tends to fall out during the day. So I would see black fall outs on my cheeks. That's not attractive at all. So, I purchased the new line of Physician Formula organic wear mascara because all of the benefits it would give, it is organic and hopefully it does not fall out like the jumbo one.

In my experience, the Organic Wear 100% Natural Lash Boosting Mascara really does what it says, but not as good as the jumbo one. It does more lengthening rather than giving a full of volume on my lashes. I feel like the volumizing formula exists, but not as obvious as the jumbo one, so I'd say it is decent. I personally like this mascara if my eyes are not sensitive to it. During the day, my eyes would be itchy, and at first I thought it wasn't because of the mascara, I thought it was my contact lens or something. But, the next few days my eye lids became so dry and flaky, especially on my outer corner. Not only that, I had a few red bumps (like rashes) on my lids. So, of course I was panic! 

I really did not think it was because of the mascara, but that was the only new thing on my eye make-up or routine. So I discontinued using it, and my eyes are not itchy anymore, and the rashes had gone right after the next day I stop using it. 

Overall, I would love this mascara if I am not allergic to it, too bad :( I like it because it has a big brush that will separate my lashes to lengthen them, and give them more volume. It says 44 percent of the total ingredients are from organic farming, I do not know what it is, but I might be allergic to one or some of them. So, I would say if you want to try this mascara out, sure you can, because this experience might only apply to me because every person's eyes are different. 

Where to buy: any drugstores (CVS, Walmart, Target, Walgreens, etc), prices may vary, but I got mine for $9.99 (.26oz).

Have you ever tried this mascara yet? If you have, what was your experience? If you haven't, what do you think of this mascara in general? Will you try it out?? Leave in the comment below! :) 

If you have any requests, don't hesitate to tweet me (click here for my Twitter) or post on my wall (click here for my Facebook)! :) And have you entered my giveaway yet? Click here if you want to win a cool prize! :)

Love YOU, 
Alexandra 


Monday, February 27, 2012

Get a Slimmer Face Instantly!!


Hi lovelies! Today I am gonna be teaching you on how to make your face look slimmer in just a second. Thanks to make-up products and application because they can make us look like we just drop a few pounds, haha. I use this method every time I have makeup on, so my face actually look rounder in the real life, haha.

Some of you might have already known this method, people call it: face contouring. Face contouring is so popular because it really can totally change your look (in a better way of course) and used by many celebrities, especially on the red carpet events. If you use my face contouring methods, you'll have the same results as those celebrities :) It is really easy and can be achieved in just a minute, and your face won't look flat and has definition. Let's get started!

There are three ways to contour your face:
  • First, after you finish applying your foundation on, use a creamy foundation or concealer that is two to three shades darker than your actual skin tone. If you are fair with yellow undertones like me, I like to use COVERGIRL & Olay Simply Ageless Foundation in Classic Tan. After you finish contouring your face, apply face powder and you are done. This first method is to get a natural shadow on your face without being too dramatic. The best tool for this method is to use a synthetic angled brush (my favorite is Sigma F84), or a small rounded brush like MAC 109
  • Second, use a bronzer or face powder (again, that is two to three shades darken than your skin tone). Apply it after your foundation and setting powder. This method will also create a natural shadow on your face but more dramatic. My current favorite is MAC Studio Careblend/Pressed Powder in Dark (click here for review, photos, and swatches). The best tool is a small powder brush like MAC 109 or MAC 116
  • Last method is to combine first and second method together to get a deeper and more intense contour. So, start off with your foundation, then a darker shade creamy foundation/concealer. After you finish applying these two products, set everything with a setting powder or translucent powder. Afterwards, apply a bronzer/darker face powder on top of where you put the darker cream foundation/concealer. And you're done! :) 
The key to a beautiful face contouring is to blend, blend, blend... Because you want to look natural as you have a natural shadow going on your face. If you are not blending the bronzer carefully, people will see a harsh line on your face, and that wouldn't be flattering at all. And the key to blend is to use a good blending face brush with a smaller head, MAC 109 is a good example for this. 

Here I make a 'face diagram' on the spots where you contour your face: (sorry it looks so amateur! haha)

The most difficult part is to determine where your under cheekbones are, and this is the most essential part that you cannot skip when doing a face contouring. To define your under cheekbone is actually really simple. There are two ways to do it. First is the simplest and easiest way, that is by making a fishy face. By making a fishy face (yes, you'll look silly ;p), you will see that your face look slimmer in an instant. The second way of doing it is to measure and make a straight line from the edge top of your ear to the outside corner of your lip. But the line should be emphasized on the bottom edge of your cheekbone, and it should fade away into nothing by at least at the half way before you reach outer corner of your lip. Here let me show you another "amateur-made" diagram: 

Before I go to steps by steps on contouring, I want to explain about bronzers briefly. The best bronzer to use is a matte bronzer (means no shimmer). Face contouring gives you a natural shadow on your face, hence will make it look slimmer. However, some bronzers tend to contain redness or a hint of orange that will make the shadow look fake. So, find a bronzer that looks like a natural tan skin or has a medium brown shade. (I will do a post on my favorite bronzers!)

Steps by Steps 


Again, start off from the top edge of your ear to the outer corner of your lip 

To the side of your face

And to the temples

To the jawline
And don't forget your neck too, Otherwise your neck will look lighter than your face.


Finished Look. See how my face now looks more oval, and definitely slimmer? :) 


Contouring your face needs practice. But once you get it, you will be able to do it without even making a fishy face! You'll get used to with measuring the line and doing other contour steps. So, if you have any questions, feel free to leave in the comment below! Or you can ask me on my Facebook or Twitter. Oh and my giveaway is still going, so don't forget to enter my giveaway to win an amazing prize! :) Click here to enter. 

Tell me, do you contour your face on a daily basis? So that I know that I am not alone, haha! 

XOXO, 
Alexandra 

Sunday, February 26, 2012

Review: Maybelline Illegal Length Mascara


Since we are done with reviewing Shop MAC, Cook MAC and Vera collection by MAC Cosmetics, now finally I can move on on reviewing some other products! So, as you can see on my CVS Haul (click here to read), today I am gonna be reviewing Maybelline Illegal Length Mascara.

Maybelline Illegal Length Mascara has a fiber extension formula that can make your lashes appear longer, and this product claims to build 4mm of measurable extension (pretty cool, huh?!). Maybelline calls its mascara wand "fiber-fix" brush, which has different contact points to place fiber on each lash. It comes out in three shades: brownish black, very black and blackest black. In addition, you can also choose between waterproof or non-waterproof formula.

The one that I got is the blackest black with waterproof formula. I never like waterproof mascara, but I accidentally picked this up :( so I might as well do a review about it :)

When I first applied my first coat, I honestly did not see a huge different. I like to have my lashes to appear dramatic, so I add more coats. I feel satisfied until the third coat. My lashes look longer, and have a little more volume. I honestly love the result, but why does it have to be in three coats? (You can see each coat in the pictures at the bottom of the page).

In order to have more volume on my lashes, I have to wiggle the mascara wand from root to tip of the lashes. If you just move it upward from root to tip, you'll just get more length rather than volume.

Since it has a waterproof formula, it is so hard to get off. So, if you are interested in purchasing this, I'd recommend just to get the non-waterproof formula.

Overall, I might not repurchase this mascara just because I do not see the special effects from it. However, the quality is good and it does not flake or fall out through out the day.

Where to buy: any drugstores (CVS, Walgreens, Walmart, Target, Rite-Aid, etc). Prices may vary. I got mine for $8.99 for 0.22oz.

Have you tried it out? If yes, what do you think? If not, will you consider to purchase it in the future? Let me know in the comment below and enter my giveaway to win a cool prize! :) Click here to enter. 

Much Love, 
Alexandra 


First coat 
Second coat

Third coat