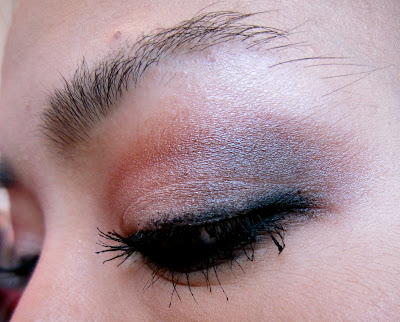
Fall is right here means we need to switch our make-up looks from bright-shimmery look to natural-brownish-reddish-smokey (you name it!). Even though I love summer more than fall, I like fall make-up looks better.
So today, I will be featuring one of the prettiest (in my opinion, at least) fall look using MAC Double Feature 5. I did a tutorial using MAC Double Feature 1 before, click here if you haven't seen it.
Briefly about MAC Double Feature 5: it is limited edition (but still sold in stores or online now!) has two eyeshadow colors. One is pale pink color, the other is dark brown with green spots. Honestly, the pale pink color is not my favorite. If you have a fair skin, this color is kind of hard to pull the pigment out. BUT, the dark brown with green spots is PRETTY! It looks dark brown, but when you apply it, it becomes a reddish brown with a hint of green. Very pretty!
In conclusion, is this palette worth the money for? Absolutely yes! It is $25, but the packaging is slim and stackable, so it does not take so much space on your make-up kit, or you can just throw it in your everyday make-up bag. In addition, each MAC eyeshadow is $15. This palette gives you two eyeshadows for $25. Good deal?
OK I am going to stop rambling now.. lets go to the tutorial!
click the pictures for larger size
the finished look
products used
eyeshadows swatches
eye brushes
steps by steps
- For a long lasting look, prime your eyes first before you put any eyeshadows. I used Smashbox Photo Finish Lid Primer.
- Take the pale frosty eyeshadow from MAC Double Feature 5 with Sigma E55, and place it onto your lid up to your browbone. This eyeshadow can be your highlighter too! :)
- Now, take Sigma E35, then apply the dark brown with green pearl onto your crease with windshield motion.
- Optional: if you want it to look more dramatic, take matte dark brown eyeshadow, like NARS in Coconut Grove, and place it slightly onto your outer corner of your lid using Sigma E30. Just a little bit, you definitely don't want to ruin your pretty dark brown with green pearl :)
- Slightly blend it out with Sigma E40.
- Line your bottom lash line with either NARS Coconut Grove, or with the dark brown with green pearl eyeshadow from the palette with Sigma E30.
- Line your upper lash line with a black pencil eyeliner. My new favorite is CARGO Eye Pencil in Black. It is really creamy and dark.
- Line your water line with it too!
- Curl your lashes and apply two coats of Benefit They're Real mascara.
You're now done with the eyes! Now let's move on to the face!
For the Face
products used
steps by steps
- Apply your foundation all over your face with Sigma F84. I used Lioele Triple Solutions BB Cream. This BB Cream is full coverage, that's why I love it!
- Apply your face powder, I used Palladio Rice Powder in Natural with CARGO Magic Brush. This is a cool, yet nice brush. It can be used to apply any powder: loose powder, pressed powder, bronzer, and blush. All in one!
- Contour your cheeks with Tarte Mineral Bronzer in Park Ave Princess. Apply it also along your temples, jawlines, and neck. Use CARGO Magic Brush to apply.
- Lastly, sweep your pink blush, like Tarte Amazonian Clay 12-hour blush in Dollface. Of course, with CARGO Magic Brush.
Now you're ready to head out! :)
Do you like this look? Leave a comment below! :)
<3,
Alexandra


No comments:
Post a Comment