Friday, September 30, 2011

Soft Smokey Eyes for Work

Hello everyone!

This is probably one of my favorite everyday looks of all time! It is not too dramatic, not too "natural" either, but really is flattering!

I created this look when I had to wear a professional business suit to class. Of course, I did not want to have black smokey eyes hahaha! So, I created this look and fell for it. Now it became almost my everyday or go-to look.

So, I decided to name this look Soft Smokey Eye for Work. You do not want to look plain when you go to work, right? Then, this look will be appropriate for you all, even for any skin tones. In addition, this look is not specifically for going to work, even you can have it when you go to class, lunch with your girls, date with your loved one, basically anything haha

ok.. I am gonna stop talking and lets get into the tutorial!

click the pictures for larger image
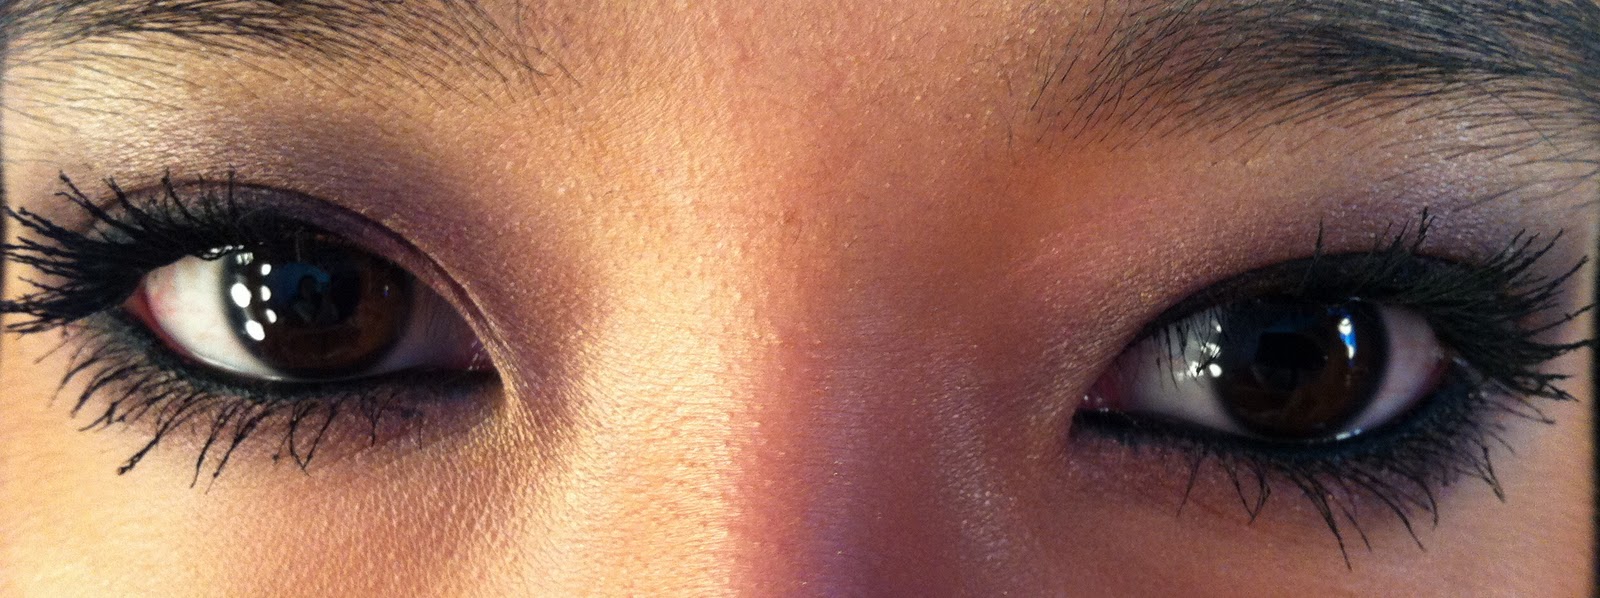
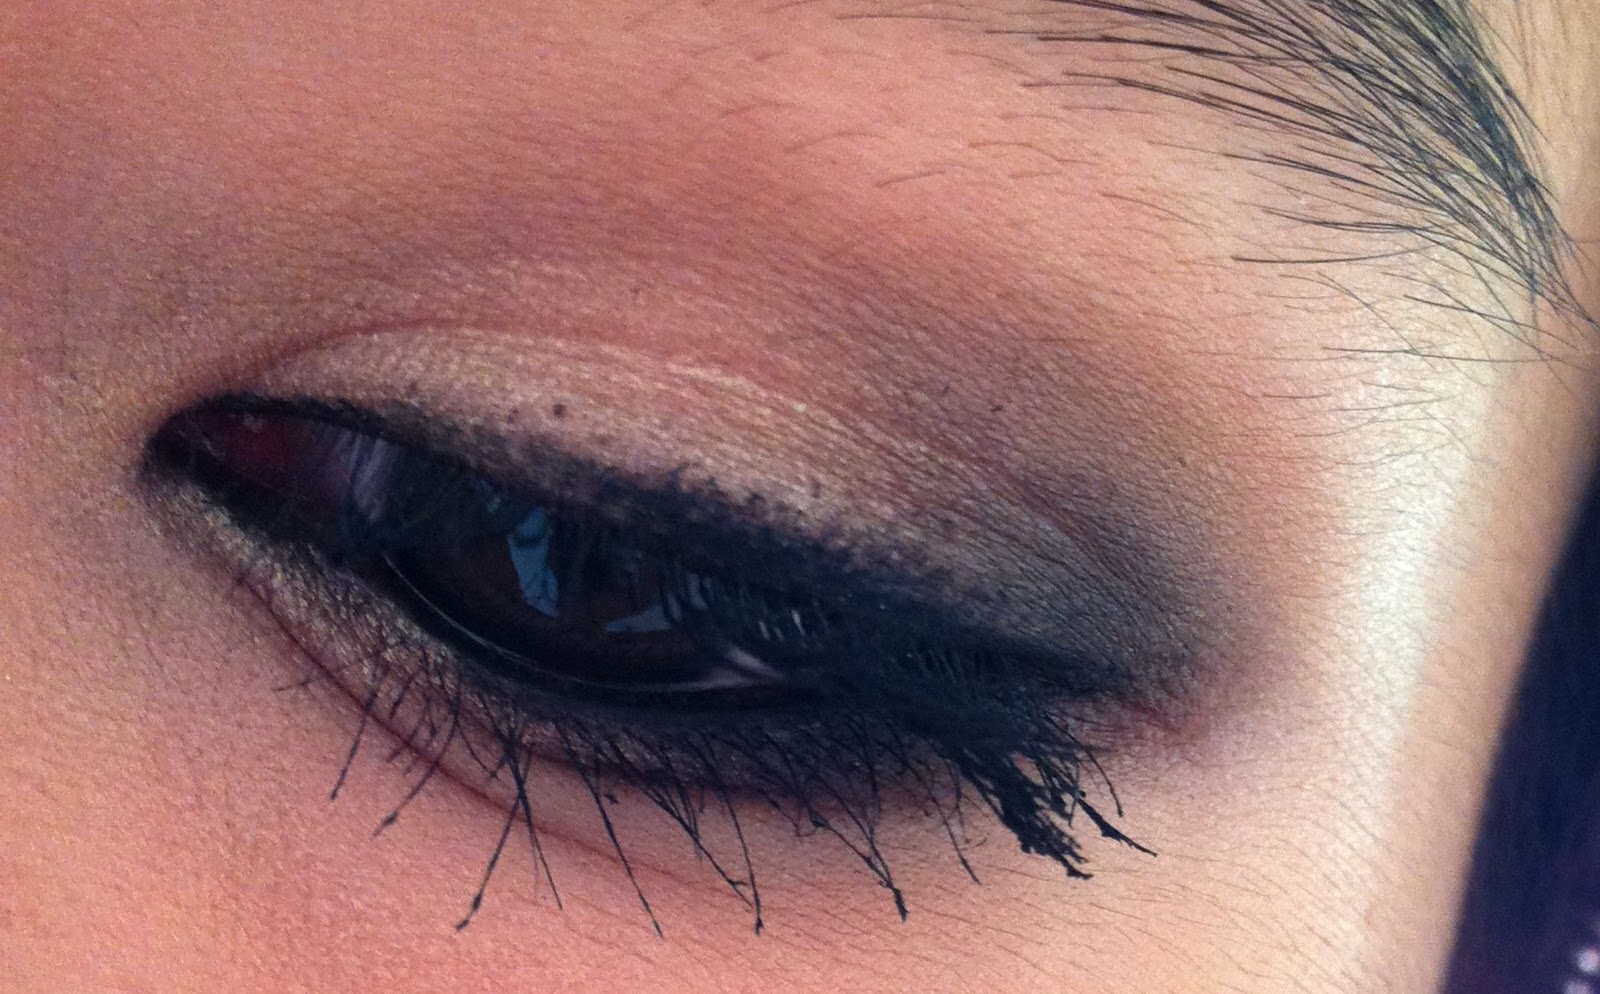
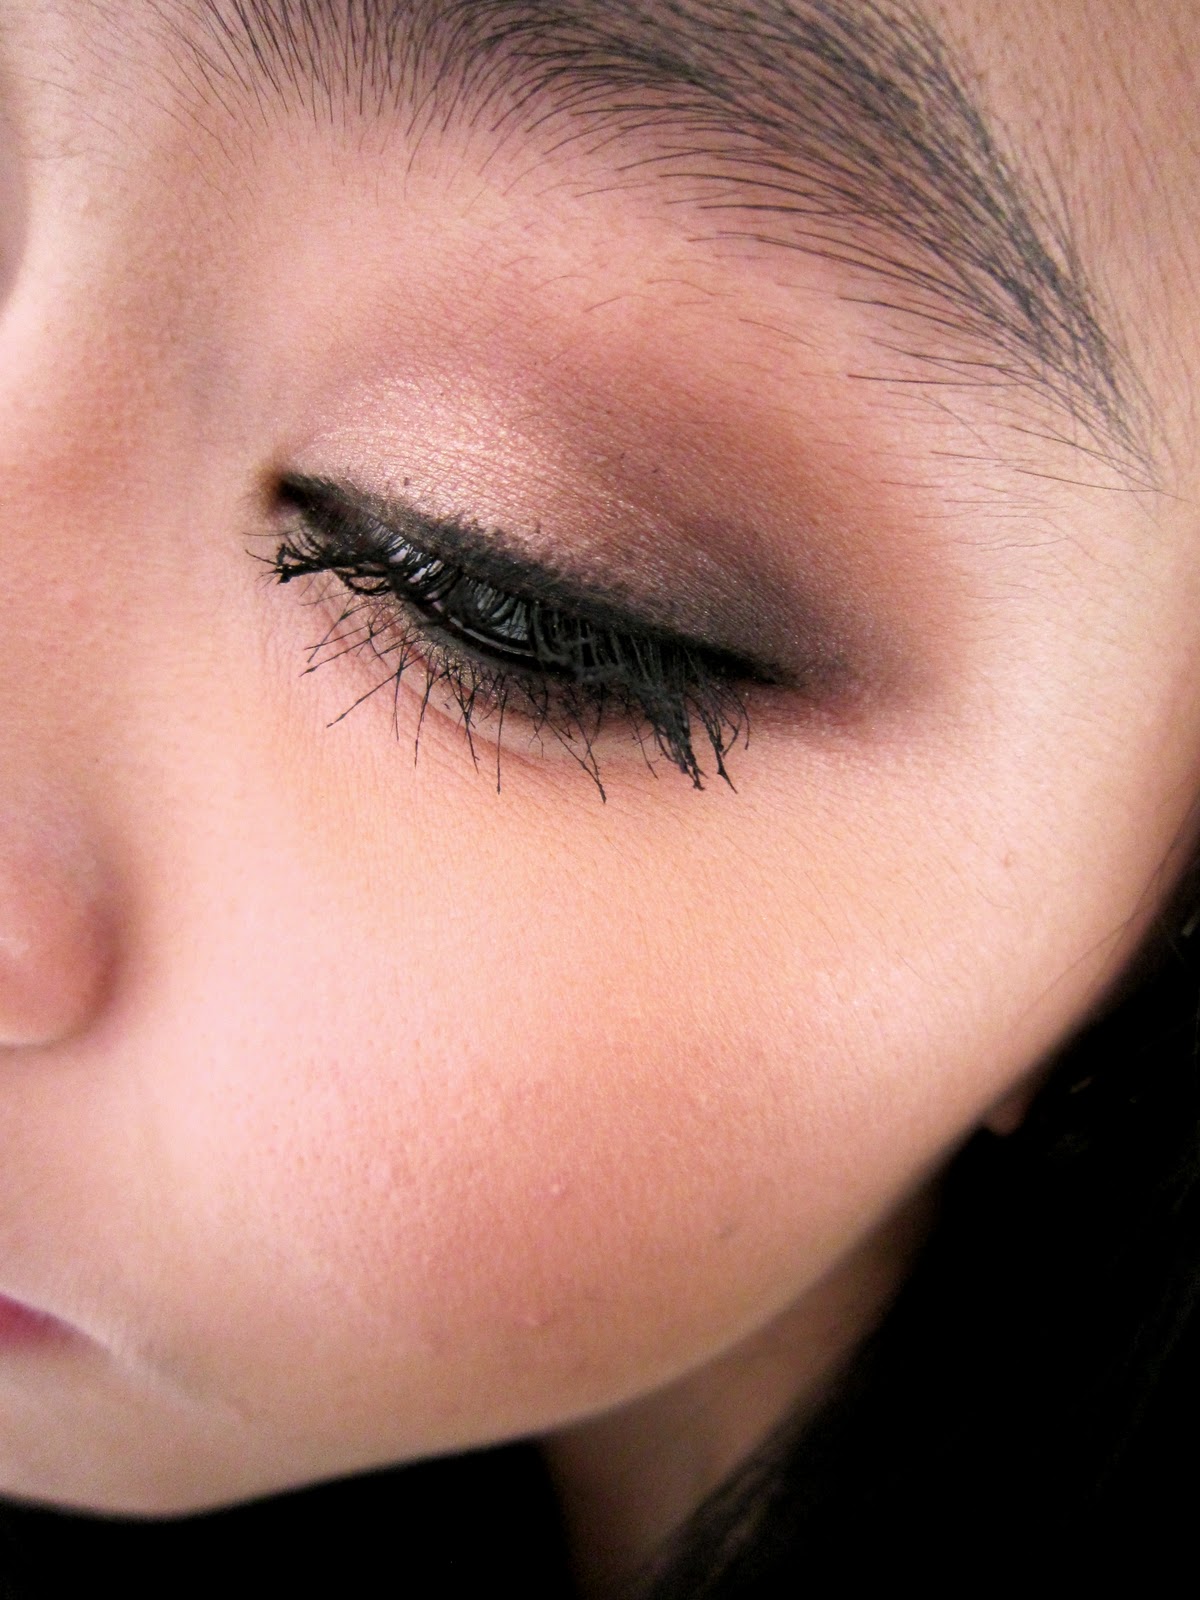
the finished look


products used

 eyeshadows swatches

 eye brushes

steps by steps
  1. Always prime your eyes first to prevent your eyeshadows from creasing. I used Benefit Stay Don't Stray. Just apply it with your finger.
  2. Take MAC Phloof! and apply it all over your lid up to your browbone using Sigma E55. In other words, MAC Phloof! is going to be your lid color as well as your highlighter. 
  3. Apply MAC Cork onto your crease using Sigma E35 with a windshield motion. 
  4. Take MAC Print, and sweep it forward to the outer corner of the lid using Sigma E30. REMEMBER, don't apply it too much, otherwise it will look smokier and darker (unless it is what you're looking for!). 
  5. Blend everything slightly with Sigma E40
  6. Line only half of your upper lash line with CARGO Eye Pencil in Black, or use any black eyeliner. 
  7. Line half of your lower lash line (from outer corner inwards) with a little bit of MAC Print with Sigma E30. Line the other half with MAC Phloof!.
  8. Line your waterline with a black eyeliner. 
  9. Curl your lashes and apply two coats of Benefit They're Real Mascara
You're done! 


Useful notes:
  • You do not need to use the exact same products if you don't have them. 
  • MAC Phloof! is basically a shimmery campaign colors. You can use any shimmer light colors, like beige, white, or light gold. 
  • MAC Cork is a matte soft brown. If you have MAC Soft Brown, MAC Wedge, or MAC Saddle, then you can use one of them. Otherwise, just use any soft brown color, and it has to be matte, means no shimmer at all. 
  • MAC Print is a grey eyeshadow with a hint of shimmer. You can use any grey eyeshadow, no matter it is shimmer or matte. You even can use black if you want to, but apply it really gently with a really small amount of it. 


<3,
Alexandra 


Thursday, September 29, 2011

Smokey Violet

Hey everyone!

Purple eyeshadows sometimes can be tricky, depending on how you choose your purple colors. Today, I am going to show you how you can pull of purple eyeshadows by making it wearable, even for everyday look perhaps.

Let's get started..

click the pictures for larger size

the finished look

products used

eye brushes

 eyeshadows swatches

steps by steps

  1. If you want your eyeshadows to stay all day long, prime your eyes first with an eye primer. But this time, I was priming my lid with MAC Paint Pot in Fresco Rose. This is not available anymore, but NYX Jumbo Eye Pencil in Strawberry Milk is basically the same with Fresco Rose. 
  2. Apply the purple eyeshadow from MAC Mineralized Eyeshadow Duo in Earthly Riches onto your lid up to your crease, using Sigma E55. This eyeshadow duo is not available anymore, but you can use MAC Mineralized Eyeshadow Duo in Pretty & Prim, the darker burgundy purple side. However, any plummy burgundy purple eyeshadow will work!
  3. Apply the same eyeshadow onto your crease using Sigma E35
  4. To make it look smokey, apply MAC Eyeshadow in Shadowy Lady onto outer corner with Sigma E35. Then, blend it with Sigma E40
  5. Apply a little bit of MAC Shadowy Lady in your lower lash line with Sigma E30
  6. Line your upper lash line and water line with Stila Kajal Eye Liner in Onyx
  7. Curl your lashes and apply COVERGIRL Lashblast mascara in Very Black
You're done with the eyes! Keep reading for the face tutorial...


For the Face

products used


steps by steps
  1. Apply Lioele Triple Solutions BB Cream with Sigma F80 all over your face. 
  2. Cover your dark circles or any imperfections with Eve Pearl Salmon Concealer in Medium. Dab it on with Sigma F70, then blend it with your ring finger. 
  3. Pat your face powder (no matter it is loose powder or pressed powder) with a powder puff evenly all over your face. Focus on your T-zone area, where your most oily part is. FYI (if you did not know yet, T-zone area is from your forehead to your nose bridge. See how it creates a "T?") I used Palladio Rice Powder in Natural
  4. Contour your cheeks, temples, jawlines, and neck with Benefit Hoola Bronzer with MAC 109
  5. Sweep a radiant pink blush, like Smashbox blush in Radiance in the apple of your cheeks, using MAC 109 again. 
And there you have it! 


See how wearable it is? 

Let me know if you're trying this out! Leave a comment below! :)

<3, 
Alexandra 


Wednesday, September 28, 2011

I got a serious injury!

Hey guys,

I know I have not posted blogs as frequent as I did before. I wasn't slacking though, but school was so hectic until it made me unable to keep up with my blog. More than that, I got a serious injury on my face from a microdermabrasion tool.


So, I saw a couple of YouTube videos, talking about a microdermabrasion tool called Personal Microderm. If you do not know what it is, it is basically a tool to make your skin look younger by minimizing the appearance of fine lines, wrinkles, enlarged pores, and blemishes. However, usually you can get this done at a dermatologist. I know I don't have fine lines or wrinkles yet, but I do have blemishes. So who doesn't want to have a perfect skin? Well, these YouTube gurus were so convincing, so I checked the website, watched the how-to videos, and it became more even convincing!

It is $179, which is pretty expensive. But, if you go to dermatologist, each treatment cost hundreds of dollars. I honestly have never done this before, either alone or dermatologist. So, I decided to try.

When it has arrived, I did not open the box for a week, I just left it on the table. I did not know why, but I had bad feeling about it, that was why I did not open it or try it on directly. Finally a week after, I opened the box, and spent an hour learning how to use it. I watched the video really carefully (the box included a CD, but it was broken, so I have to watch it from its website), read the instructions, and tried it on my elbow. OMG, when I tried it on my elbow, the tool sucked my skin directly and it scared me! But finally, I figured it out.

I did not try it on my face directly at that time. It was on Friday night, I got nothing to do, so I decided to use it (but still the bad feeling was there!). I practiced with it on my chest first, then moved on to the face.

You know what happened?

The tool sucked my skin, and I could not move it. Then, I forced it to get it off.

The result?

It scratched my face off.


how awful is that? (this is the next day, which was Saturday)

Once it scratched my face off, I stopped using it. At first, the scab or the scar was not that obvious. When I woke up the next morning, OMG I felt like I wanted to scream and cry! and I had to go to work at that time. I was so panic, and I tried to cover it with make-up (I know it's bad! but I was too panic to think). However, the scar was so intense even make-up could not cover it. 

In the middle of my work, I googled how to get rid of it. A lot of ways apparently, one of it was to use honey. So, then I put honey on my scar. 

Then, my sister came visiting me at work, she saw my face and she was also like, "WHAT IS ON YOUR FACE?" So I told her the whole story... and she suggested to treat the scar soon, and to use a scar gel called Mederma. 

So, I went to Walgreens, and I found Mederma. It was $19.99, which was pretty expensive, but whatever.. I bought it. I removed my make-up, and applied it. It is said to apply it 3-4 times on a new scar, but I applied it like 10 times a day. Every time before I applied it, I washed my hand first. 


Now, I am going to show you the improvement day by day... you judge :)

Day 1 (Sept 18)

Day 2

Day 3

Day 4


Day 5

Day 6

Day 7

Day 8

Day 10 (I forgot to take picture on Day 9!)

Day 11 


Mederma said a new scar will recover in 8 weeks, but as you can see in Day 8, the scar has recovered and just turned into redness. In my opinion, Mederma helped to cover the scar by forming a new skin. That's why, when it was still forming a new skin, I did NOT put any make-up on it. I only put on Mederma gel. The scar honestly would look obvious when the gel is on, but seriously, it was worth it! And since the scar is covered by the new skin, I can put on make-up again as usual, just to cover the redness. 

Lastly, I want to say BIG thank you to my sister for suggesting me to use Mederma, unless I would not know, and still have the scar now. Also, BIG thank you to Mederma itself. You all know that make-up is my life and passion, so when I still had the scar, it made my days worse whenever I looked into the mirror. 

For all of you who experienced this, YOU ARE NOT ALONE! I know how it felt to have a scar on your face, to have people looking at you, to have people asking how it happened. As long as you choose the right product, and you believe that it will work, you'll be fine. In addition, it improves your confidence too! 

Thank you so much for reading my blog, hope it inspires all of you! I apologize it is so long! 

Love,
Alexandra

p/s: I had returned the personal microderm btw!:)

Tuesday, September 27, 2011

Pretty Fall Look using MAC Double Feature 5

Hey everyone!

Fall is right here means we need to switch our make-up looks from bright-shimmery look to natural-brownish-reddish-smokey (you name it!). Even though I love summer more than fall, I like fall make-up looks better.

So today, I will be featuring one of the prettiest (in my opinion, at least) fall look using MAC Double Feature 5. I did a tutorial using MAC Double Feature 1 before, click here if you haven't seen it.

Briefly about MAC Double Feature 5: it is limited edition (but still sold in stores or online now!) has two eyeshadow colors. One is pale pink color, the other is dark brown with green spots. Honestly, the pale pink color is not my favorite. If you have a fair skin, this color is kind of hard to pull the pigment out. BUT, the dark brown with green spots is PRETTY! It looks dark brown, but when you apply it, it becomes a reddish brown with a hint of green. Very pretty!

In conclusion, is this palette worth the money for? Absolutely yes! It is $25, but the packaging is slim and stackable, so it does not take so much space on your make-up kit, or you can just throw it in your everyday make-up bag. In addition, each MAC eyeshadow is $15. This palette gives you two eyeshadows for $25. Good deal?

OK I am going to stop rambling now.. lets go to the tutorial!


click the pictures for larger size


the finished look

products used

 eyeshadows swatches

eye brushes

steps by steps
  1. For a long lasting look, prime your eyes first before you put any eyeshadows. I used Smashbox Photo Finish Lid Primer
  2. Take the pale frosty eyeshadow from MAC Double Feature 5 with Sigma E55, and place it onto your lid up to your browbone. This eyeshadow can be your highlighter too! :)
  3. Now, take Sigma E35, then apply the dark brown with green pearl onto your crease with windshield motion. 
  4. Optional: if you want it to look more dramatic, take matte dark brown eyeshadow, like NARS in Coconut Grove, and place it slightly onto your outer corner of your lid using Sigma E30. Just a little bit, you definitely don't want to ruin your pretty dark brown with green pearl :) 
  5. Slightly blend it out with Sigma E40
  6. Line your bottom lash line with either NARS Coconut Grove, or with the dark brown with green pearl eyeshadow from the palette with Sigma E30
  7. Line your upper lash line with a black pencil eyeliner. My new favorite is CARGO Eye Pencil in Black. It is really creamy and dark. 
  8. Line your water line with it too! 
  9. Curl your lashes and apply two coats of Benefit They're Real mascara
You're now done with the eyes! Now let's move on to the face!


For the Face

products used


steps by steps
  1. Apply your foundation all over your face with Sigma F84. I used Lioele Triple Solutions BB Cream. This BB Cream is full coverage, that's why I love it! 
  2. Apply your face powder, I used Palladio Rice Powder in Natural with CARGO Magic Brush. This is a cool, yet nice brush. It can be used to apply any powder: loose powder, pressed powder, bronzer, and blush. All in one! 
  3. Contour your cheeks with Tarte Mineral Bronzer in Park Ave Princess. Apply it also along your temples, jawlines, and neck. Use CARGO Magic Brush to apply.
  4. Lastly, sweep your pink blush, like Tarte Amazonian Clay 12-hour blush in Dollface. Of course, with CARGO Magic Brush
Now you're ready to head out! :) 


Do you like this look? Leave a comment below! :) 

<3,
Alexandra